

How To Solder A 3/4 Copper Repair Coupling
Soldering Copper Pipe
Updated: November. 25, 2022
Tips and techniques you need to know
There's a right way to solder copper pipe—and a wrong style. Larn the difference so that your side by side bathroom or kitchen plumbing projection is successful and trouble-gratuitous.
You might as well like: TBD
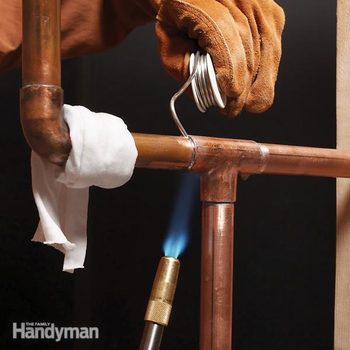
Go along nearby soldered joints from melting by wrapping a wet rag effectually them
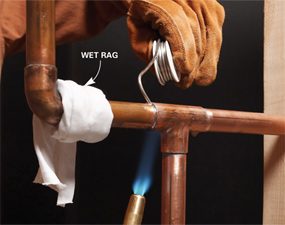
Damp rag protects joints
Wet and wring out a 2-in.-broad strip of material and wrap it around the plumbing fixtures yous want to protect. The moisture rag absorbs the heat and prevents the solder in the existing articulation from melting.
Use MAPP gas to speed up the task
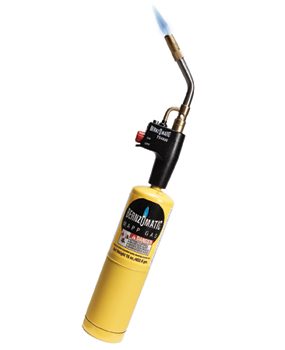
Torch tip
Lead-free solder melts at a higher temperature than the at present-banned lead-based solder. MAPP gas torches burn down hotter than propane, making them a better choice for modern solder. Five to ten seconds of heating with a MAPP gas torch is all that's required before you tin can feed solder into virtually 1/2- to 3/iv-in. pipes and fittings. Be careful, though. It'due south easier to overheat a joint with MAPP gas. If the flux turns black and the solder won't menses into the plumbing fixtures, the articulation is overheated.
Use a flame protector

Avoid fires
Don't solder close to wood or other flammable material without protecting it from the flame.

Flame protector
These small flame-retardant blankets are available at hardware stores and home centers. Y'all hang one behind the joint you're working on to insulate the flammable material and assistance foreclose fires. In a pinch yous could employ a piece of sail metallic instead. Wetting the expanse around the soldering job with a spray bottle of h2o also helps prevent fires. Go on a fire extinguisher handy as a precaution.
Buy new fittings

One-time fittings
Don't reuse quondam fittings. Recycle them instead. It'southward fourth dimension consuming and difficult to take apart and clean former fittings. And there's a good chance they'll leak. Purchase new fittings instead. You lot'll become improve results in less fourth dimension.
Use the proper amount of solder
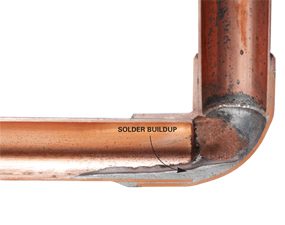
Avoid backlog solder
Don't feed too much solder into the joint. It's tempting to melt a few inches of solder into a joint every bit extra insurance confronting leaking. Merely excess solder can puddle within pipes, restricting water flow, and tin course small assurance that break loose and impairment faucet valves. Utilise about 1/2 in. of solder for ane/2-in. pipage and 3/four in. for 3/four-in. pipage. Here's a tip. Curve the stop of the solder at a right angle, leaving a few inches below the curve. The curve makes it easier to gauge how much solder you've used.
Keep threads solder-costless
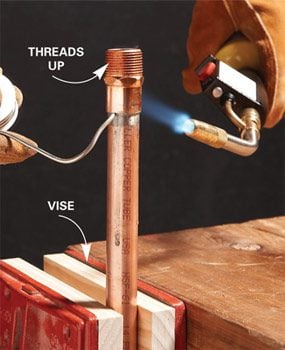
Don't become solder on threaded fittings
Solder drips can clog the threads, making it hard to get a good seal when you screw on the matching part.

Follow these steps to avert the problem
If the threaded fitting is positioned so that solder volition run down onto the threads, solder the pipe and plumbing fixtures at a workbench instead and so you can keep the fitting pointed upwards. If yous have to solder a threaded plumbing equipment where the solder will flow onto the threads, brand sure to wipe excess flux from around the joint after you lot gather the pipe and plumbing equipment. Extra flux tin run downward onto the threads, causing the solder to follow it.
Apply tinning flux

Flux
Tinning flux works but similar standard flux simply contains a bit of silverish solder powder that melts when heat is applied. The resulting thin layer of solder helps ensure a leakproof joint. Tinning flux is available at most hardware stores and home centers and but costs a picayune more than standard flux.
Go along pipes dry when soldering
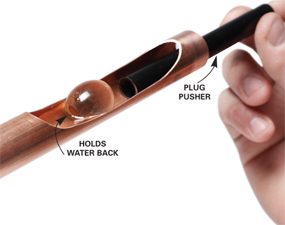
Terminate the water with a pipe plug
Don't try to solder pipes with water in them. When you're repairing or tying in to existing copper pipes, it's common to notice a small corporeality of water in them even afterward you close the valve and drain the pipes. Soldering a articulation in pipes that incorporate even tiny amounts of h2o is most incommunicable. Nearly of the heat from the torch goes into turning the water to steam, so the copper won't get hot plenty to melt the solder. Stop the trickle of water with a pipe plug. Button the plug into the pipe with the applicator tube provided. When you're done soldering, dissolve the plug by holding the torch under the spot where the plug is. Plugs for 1/two-in. or 3/iv-in. pipage are sold at home centers and hardware stores.
An old trick was to stuff a wad of soft white bread into the pipe to stop the trickle of water temporarily. This works just you run the risk of clogging aerators and valves with the partially dissolved bread.
Gather pipe in sections

Preassemble earlier soldering
Cut, flux and gather a section of pipes and solder them all at once. Soldering one joint at a fourth dimension is inefficient. Use pipe straps to back up the pipes if necessary. Be careful to clean and flux the stop of every pipe and the inside of the fittings earlier assembling them. So just before you start soldering, press the pipes firmly into the fittings to make sure they're fully seated. Start soldering at one stop of the associates and motion methodically from i joint to the adjacent.
Required Tools for this Projection
Have the necessary tools for this DIY project lined up before you start—you'll salve time and frustration.
You'll also need a flux brush, plumber's sandpaper and wire brushes for cleaning pipes, and a flame protector.
Required Materials for this Projection
Avoid last-minute shopping trips by having all your materials fix ahead of fourth dimension. Here's a list.
Originally Published: Nov 25, 2022

Source: https://www.familyhandyman.com/project/soldering-copper-pipe/
Posted by: craigtralk1957.blogspot.com
0 Response to "How To Solder A 3/4 Copper Repair Coupling"
Post a Comment